
How To Make A Full Bust Adjustment
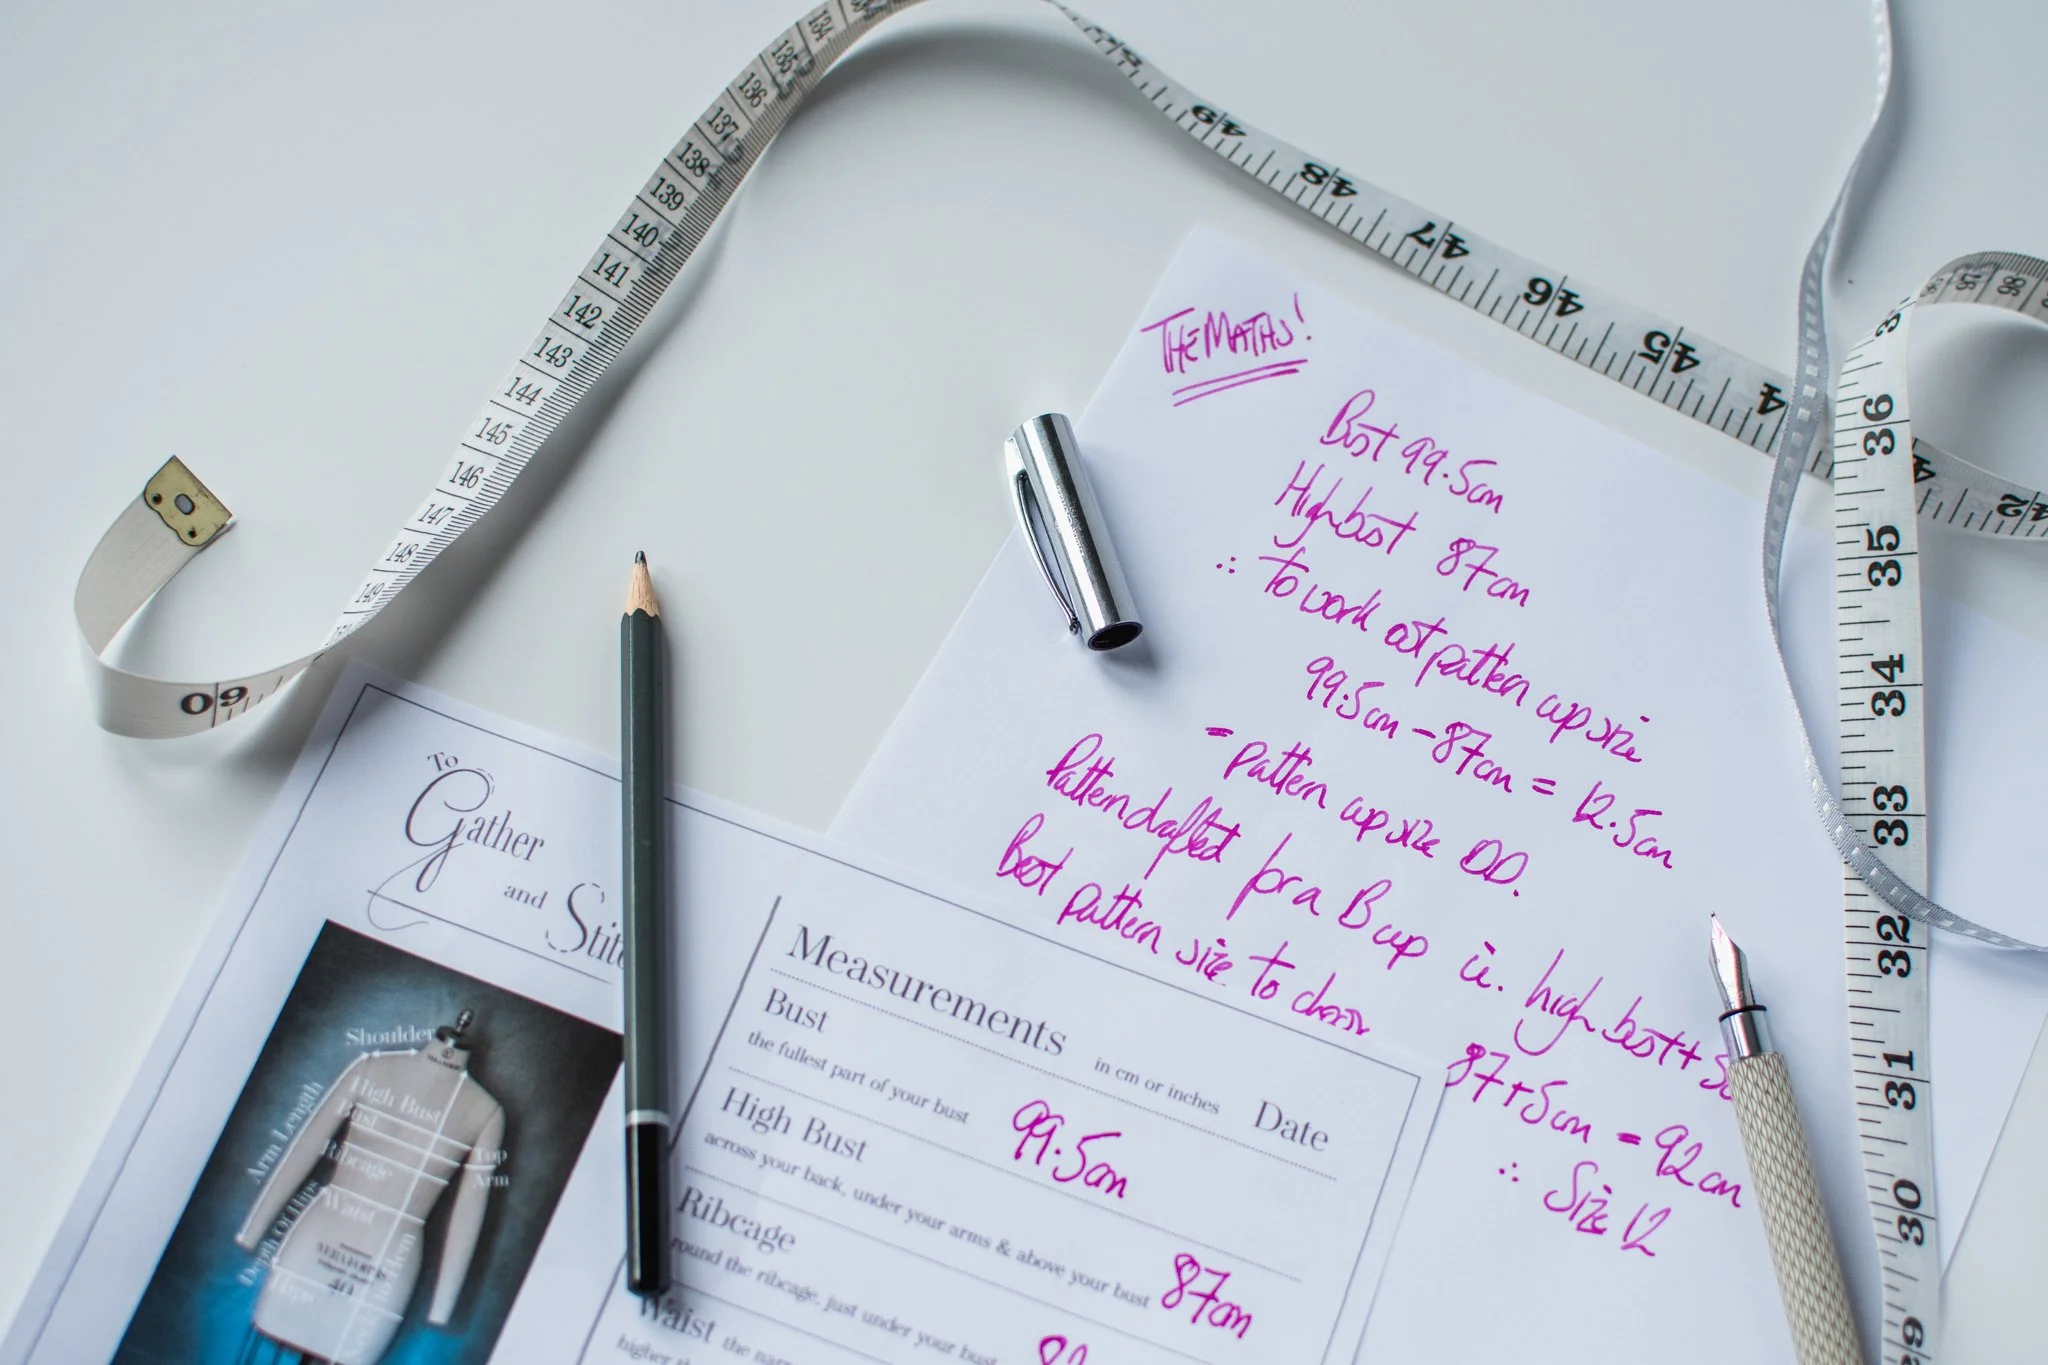
How do I know if I need to make a Full Bust Adjustment?
Have you ever bought or made a garment based on your usual bust measurement only to find that the shoulders and neckline fit well, but it just feels too tight and pulls across your bust with crease lines appearing, or even worse, rides up whilst you are wearing it? So you choose a bigger bust size only to find that the garment fits your bust but gapes badly at the neckline and the shoulder area, and the armhole seems baggy? Well, the following is a solution for you!
What does a full bust adjustment do?
It adds extra width and length to the front of a garment to fit over a bigger bust without changing the size of the shoulder or underarm seams.
You Will Need
A desktop printer.
Adobe Acrobat Reader, which you can download here for free.
A4 letter paper.
Paper scissors.
Sellotape, or clear magic tape.
A table top to lay out your pattern pieces.
First Steps
So, where to begin?
The first step is to take your body measurements. This is best done with the underwear you’re likely to wear underneath. And unless you have a trusted friend to measure you, a mirror is helpful to check the tape measure is level.
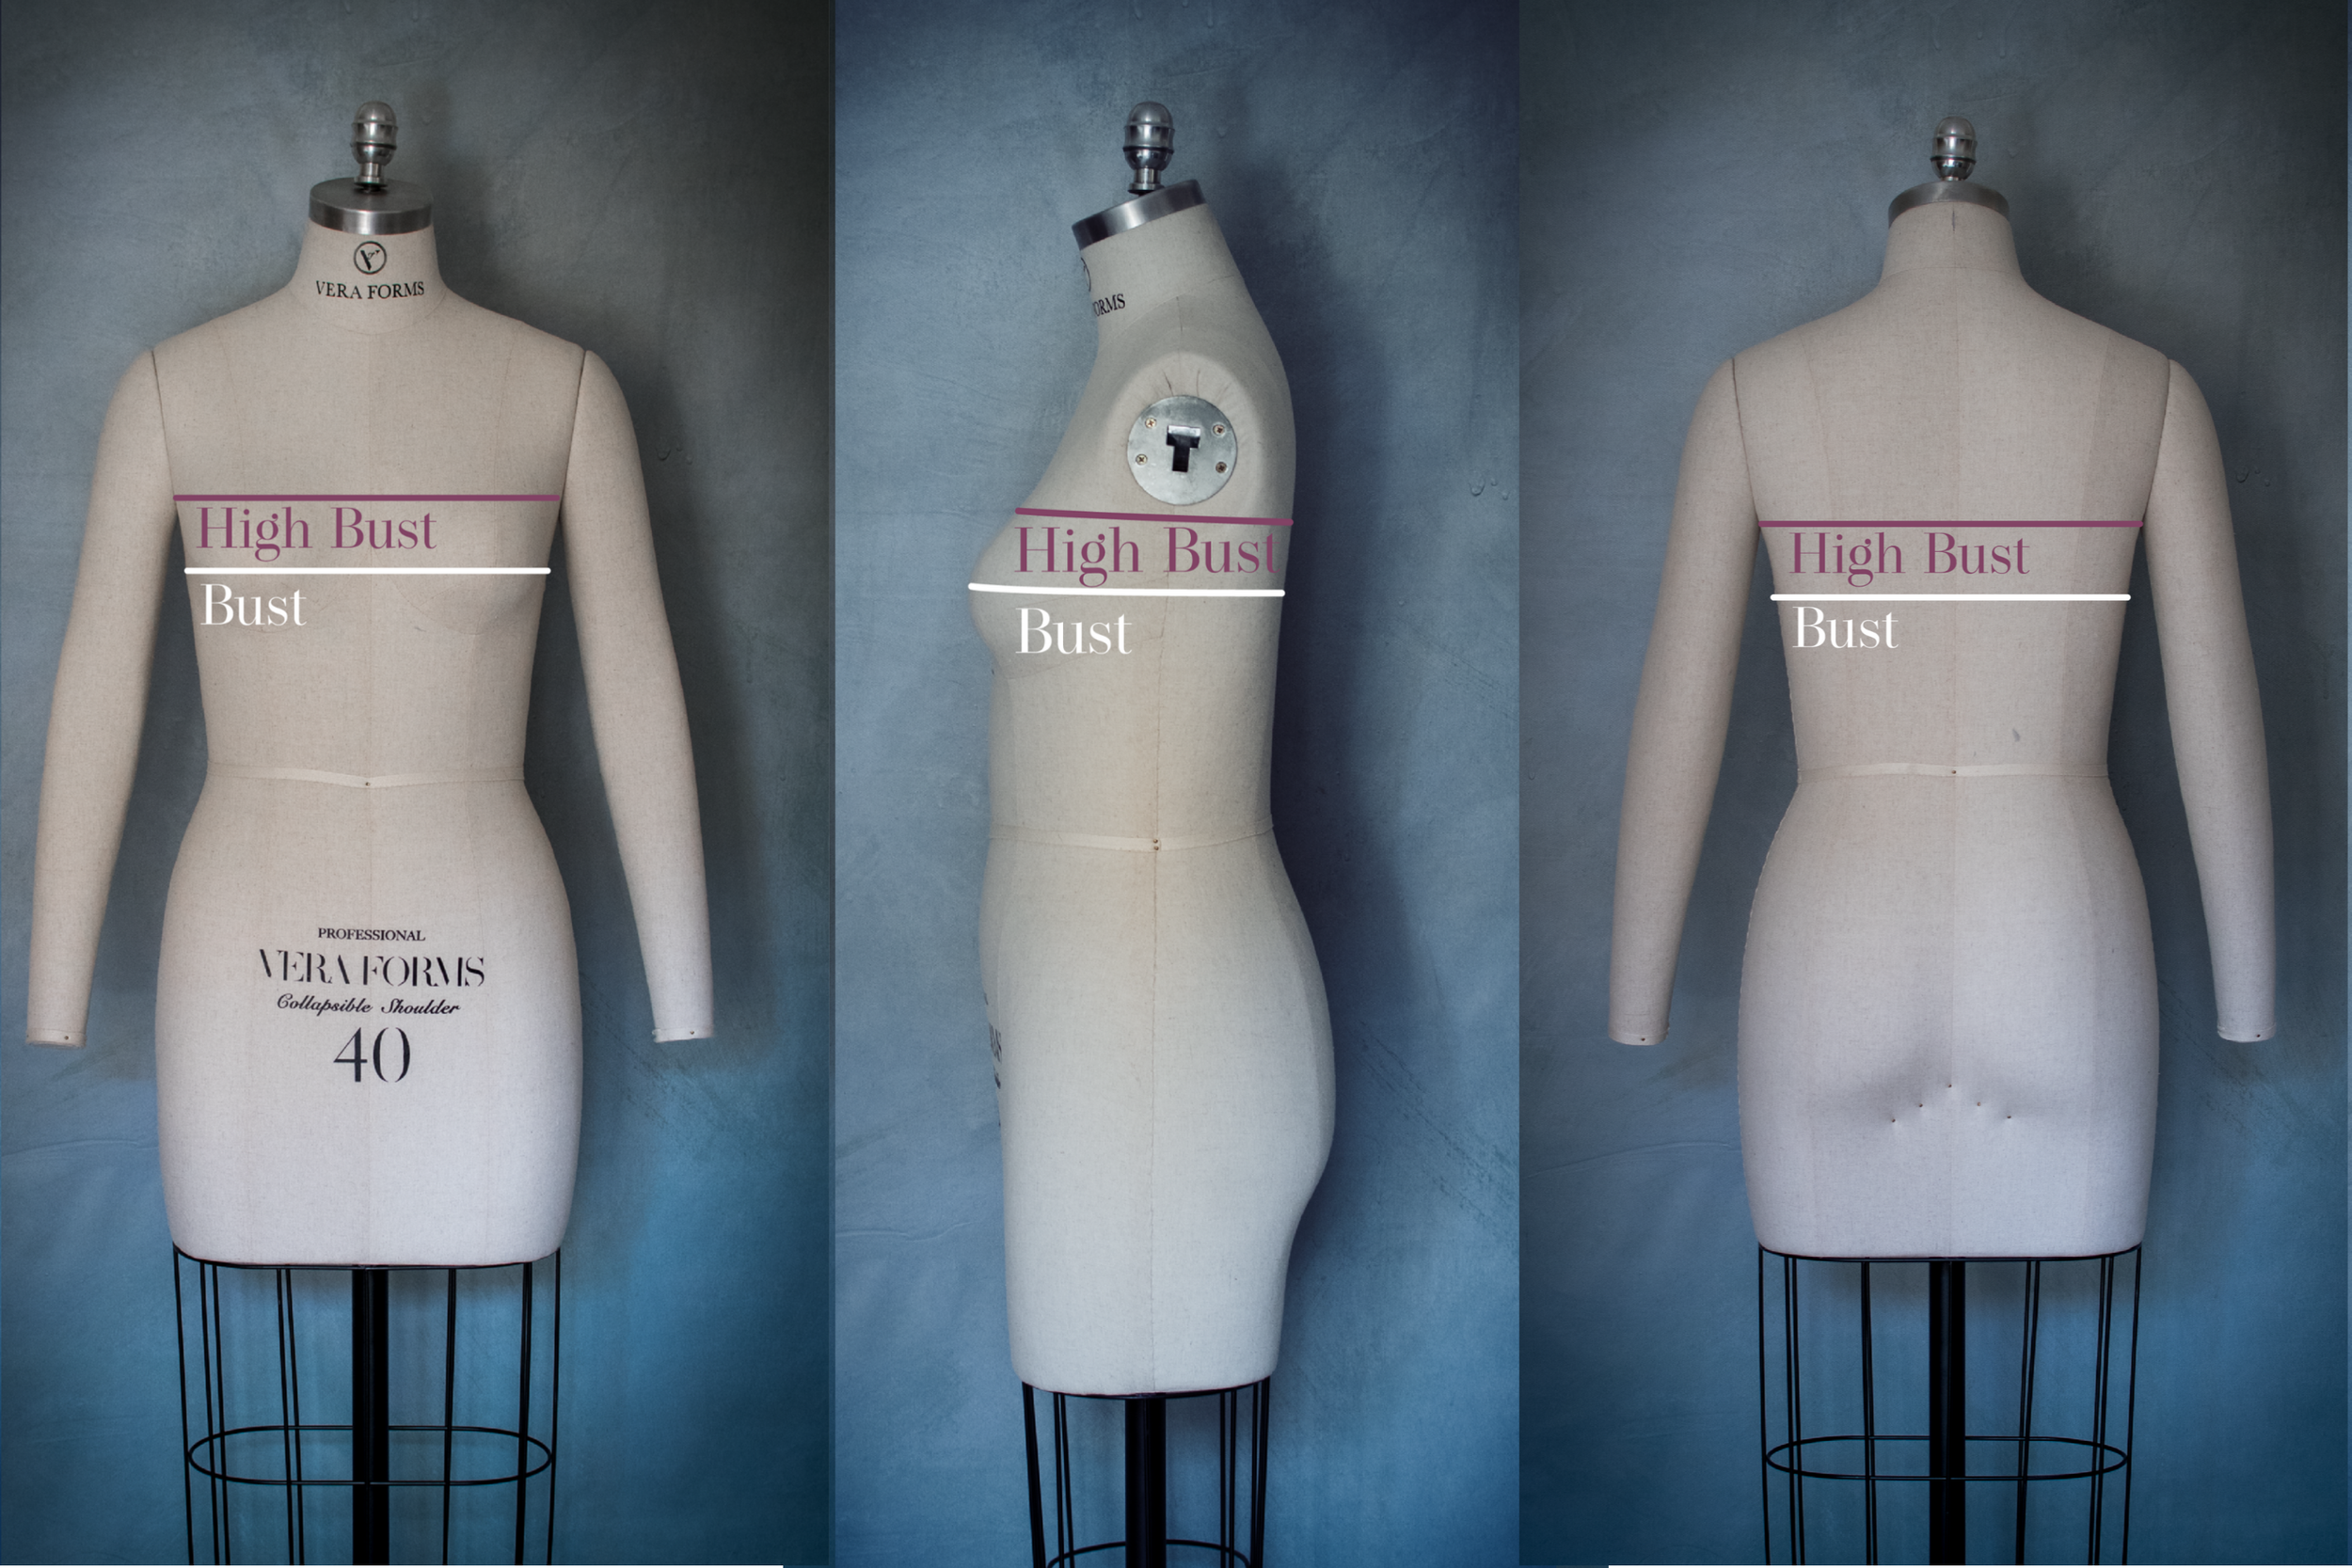
You need to know your Bust and High Bust measurements.
Your Bust measurement is a measurement around your body at the highest and fullest point of your bust. Measure your High Bust across your back, under your armpits and above your bust.
Work out your pattern cup size
Pattern cup sizes are determined by the difference between High Bust and Bust measurements. They are named the same, B, C, D cup etc., but are found differently to bra cup sizes:
A cup = 2.5 cm or 1 inch difference
B cup = 5 cm or 2 inches difference
C cup = 7.5 cm or 3 inches difference
D cup = 10 cm or 4 inches difference
DD cup = 12.5 cm or 5 inches difference
Most tissue paper and PDF patterns are drawn for a pattern B cup, but some designs are drafted for a C cup and occasionally a D.
So how do I choose a pattern size?

Now it’s time for some maths!
The first step is to determine what pattern size to use based on your High Bust measurement.
If the pattern is drafted for a B cup, take your High Bust measurement and add 5 cm.
For example, if your High Bust measures 87 cm, and you add 5 cm:
87 +5 =92 cm
you would choose a size 12 as it’s drafted for a 92 cm bust.
Then work out your Pattern Cup Size by subtracting your Bust measurement from your High Bust measurement.
If your Bust measurement is 99.5 cm and your High Bust measurement is 87 cm, you would need to add:
99.5 - 87 = 12.5 cm
12.5 cm, which would be a DD cup size.
The total amount you need to add to your pattern so that it fits you is calculated by subtracting the pattern bust size from your own Bust measurement.
e.g. 99.5 - 92 cm = 7.5 cm
But as we are altering half the front pattern ( from the side seam to the centre front), divide this amount ( 7.5 cm) by two.
7.5 ÷ 2 = 3.75 cm
It does seem complicated, I was a little confuddled for quite a while, but it will make all the difference to how your garment fits!

What To Do Next - Prepare Your Pattern
1.

Take the front pattern piece of the pattern and make a copy by tracing it using pattern paper or Swiss tracing paper.
Make sure that you mark all the dart positions and the bust point too.
2.
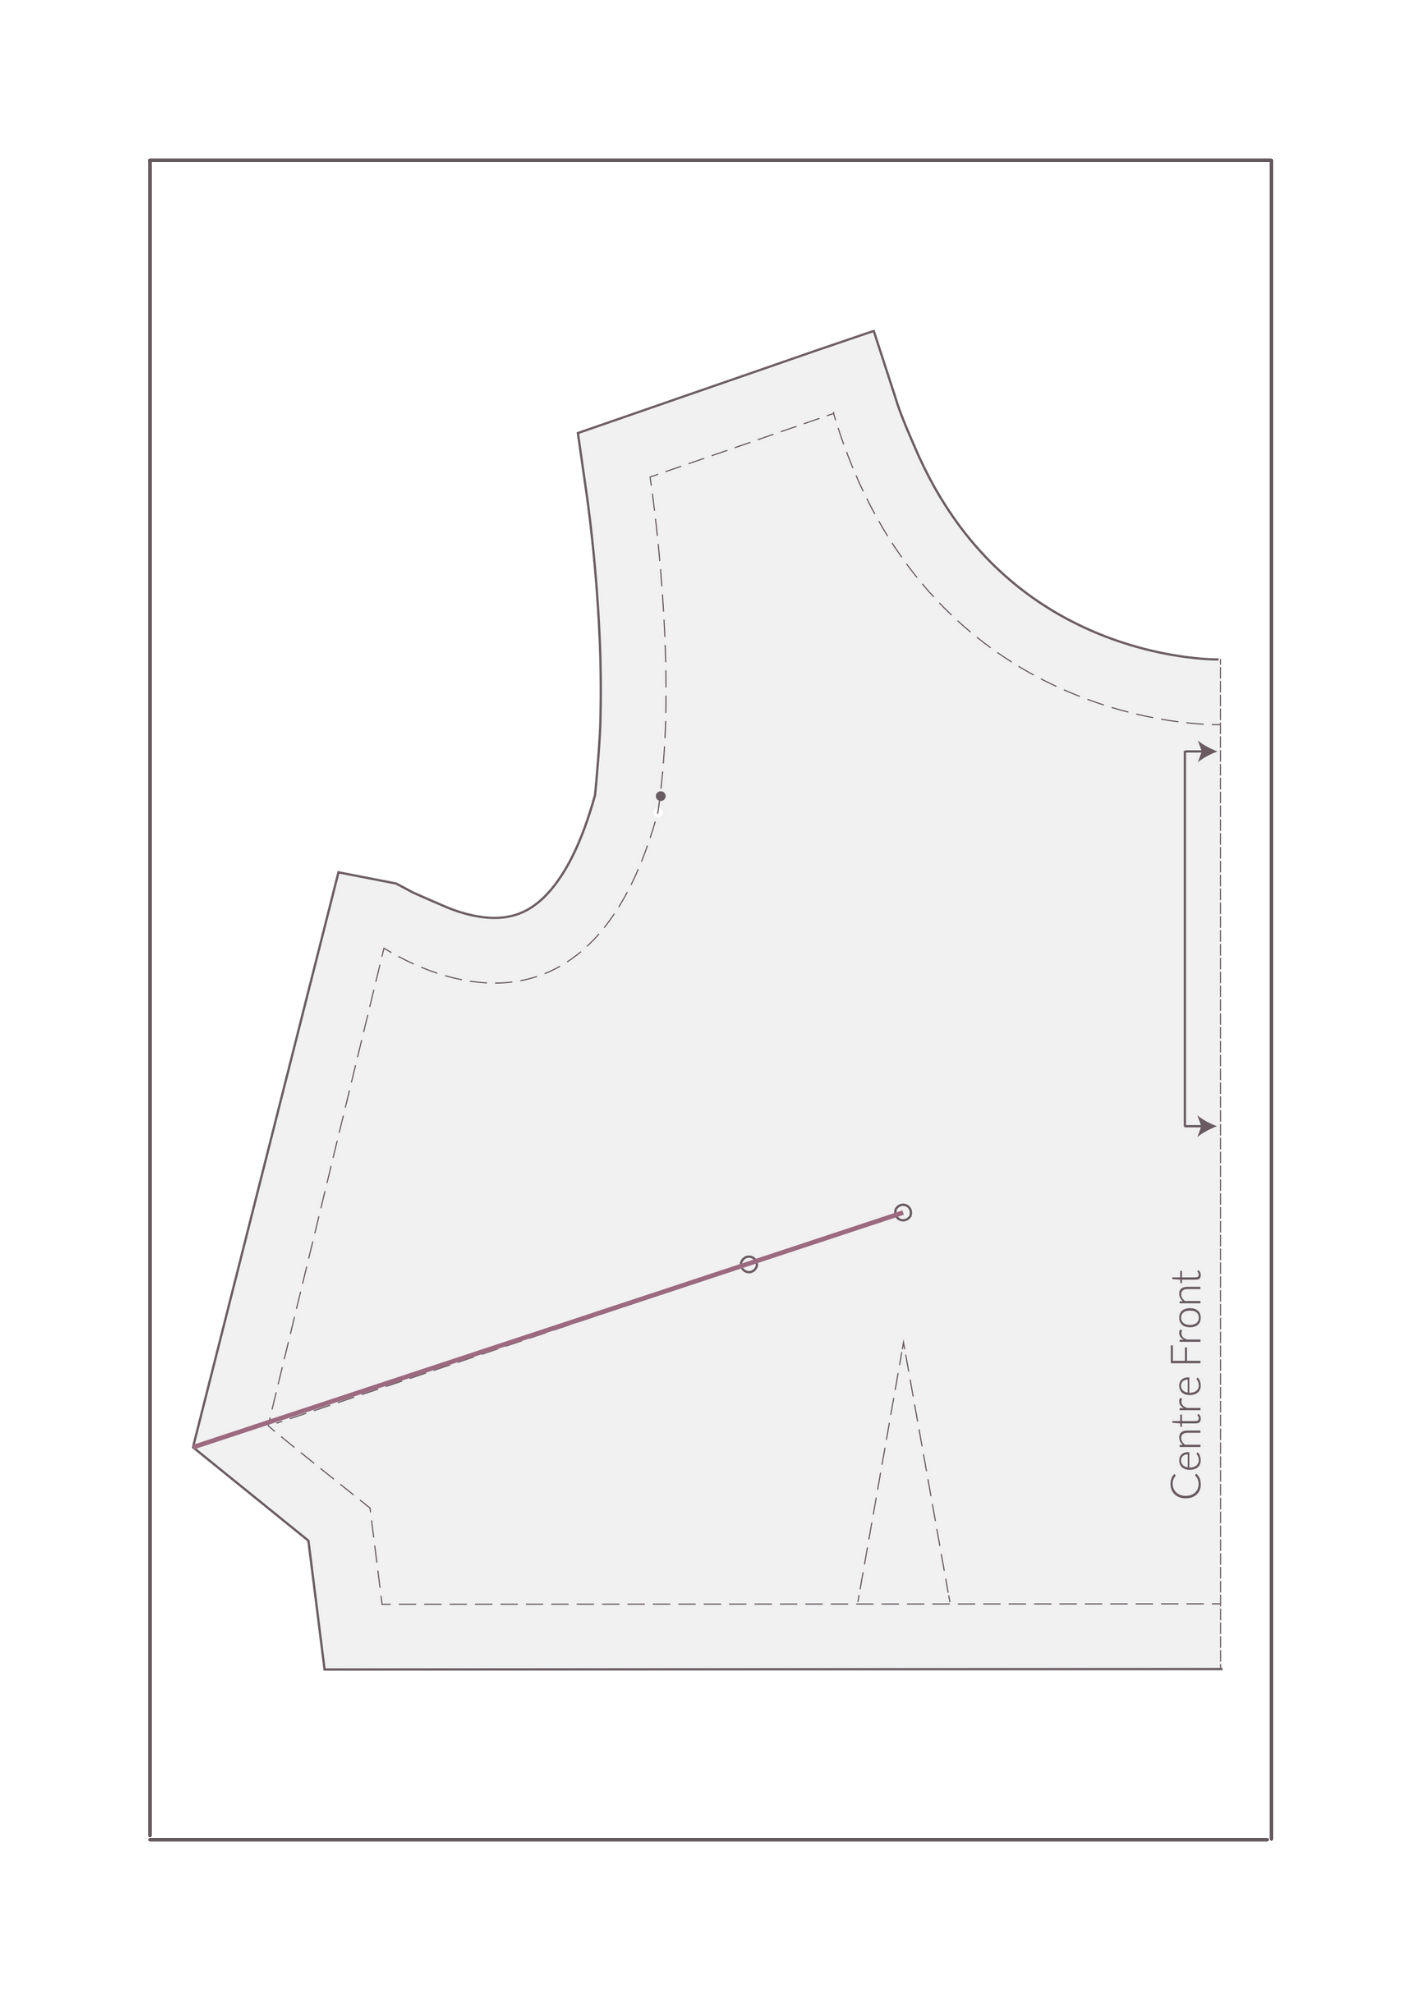
Draw a line joining the centre of the bust dart to the bust point.
3.

Draw another line parallel to the centre front from the bust point to the waist; on my patterns, you’ll find that this will usually run through the middle of the waist dart.
4.
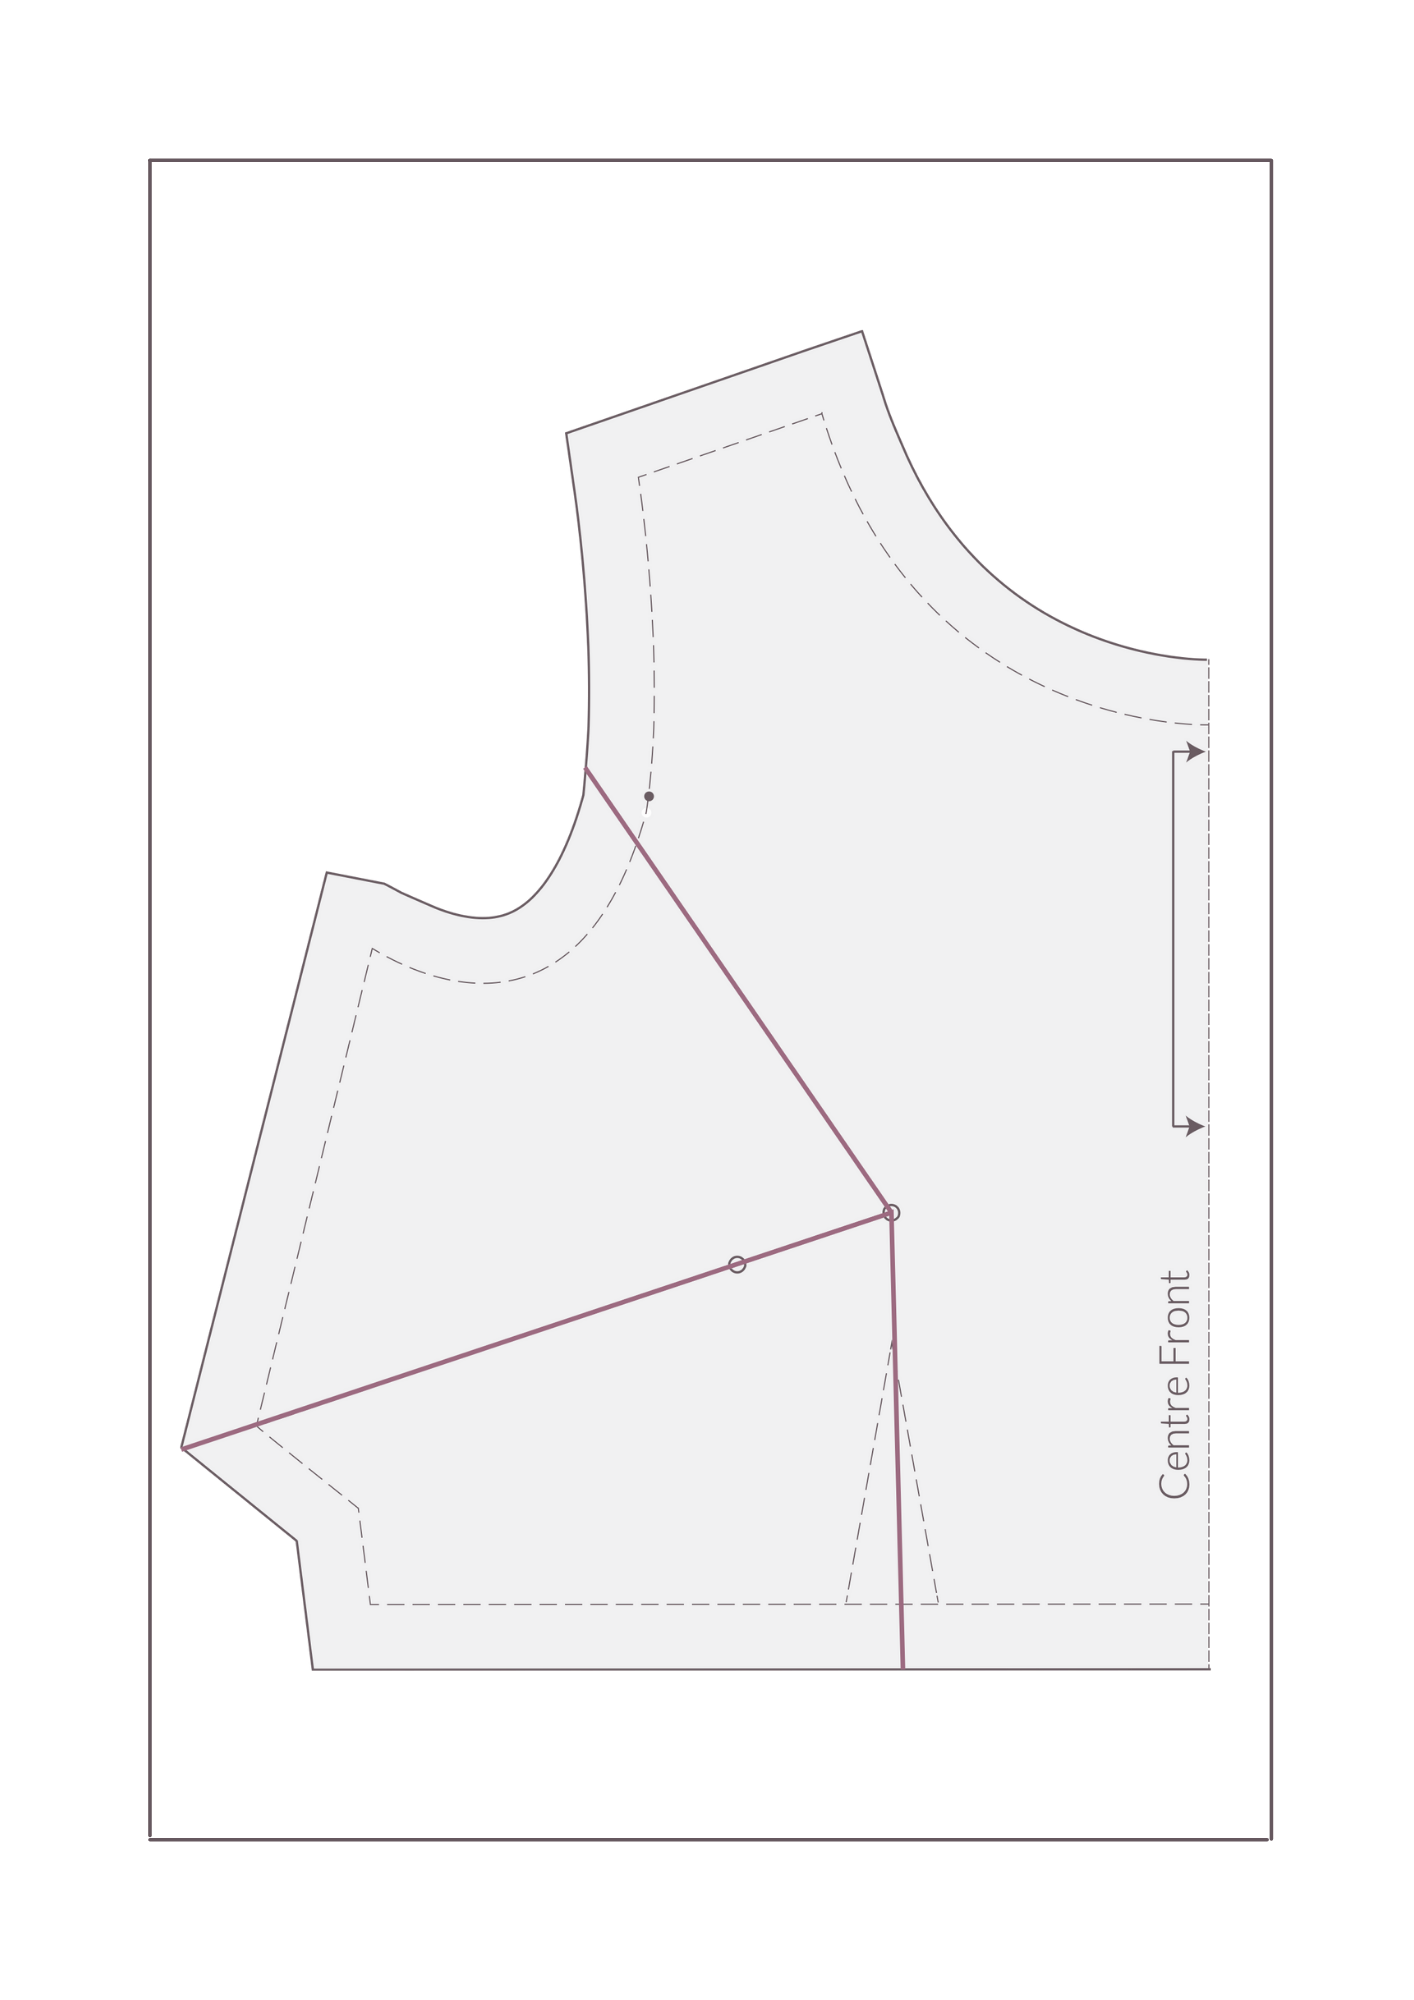
Draw a third line from the middle of the armhole to the bust point.
5.
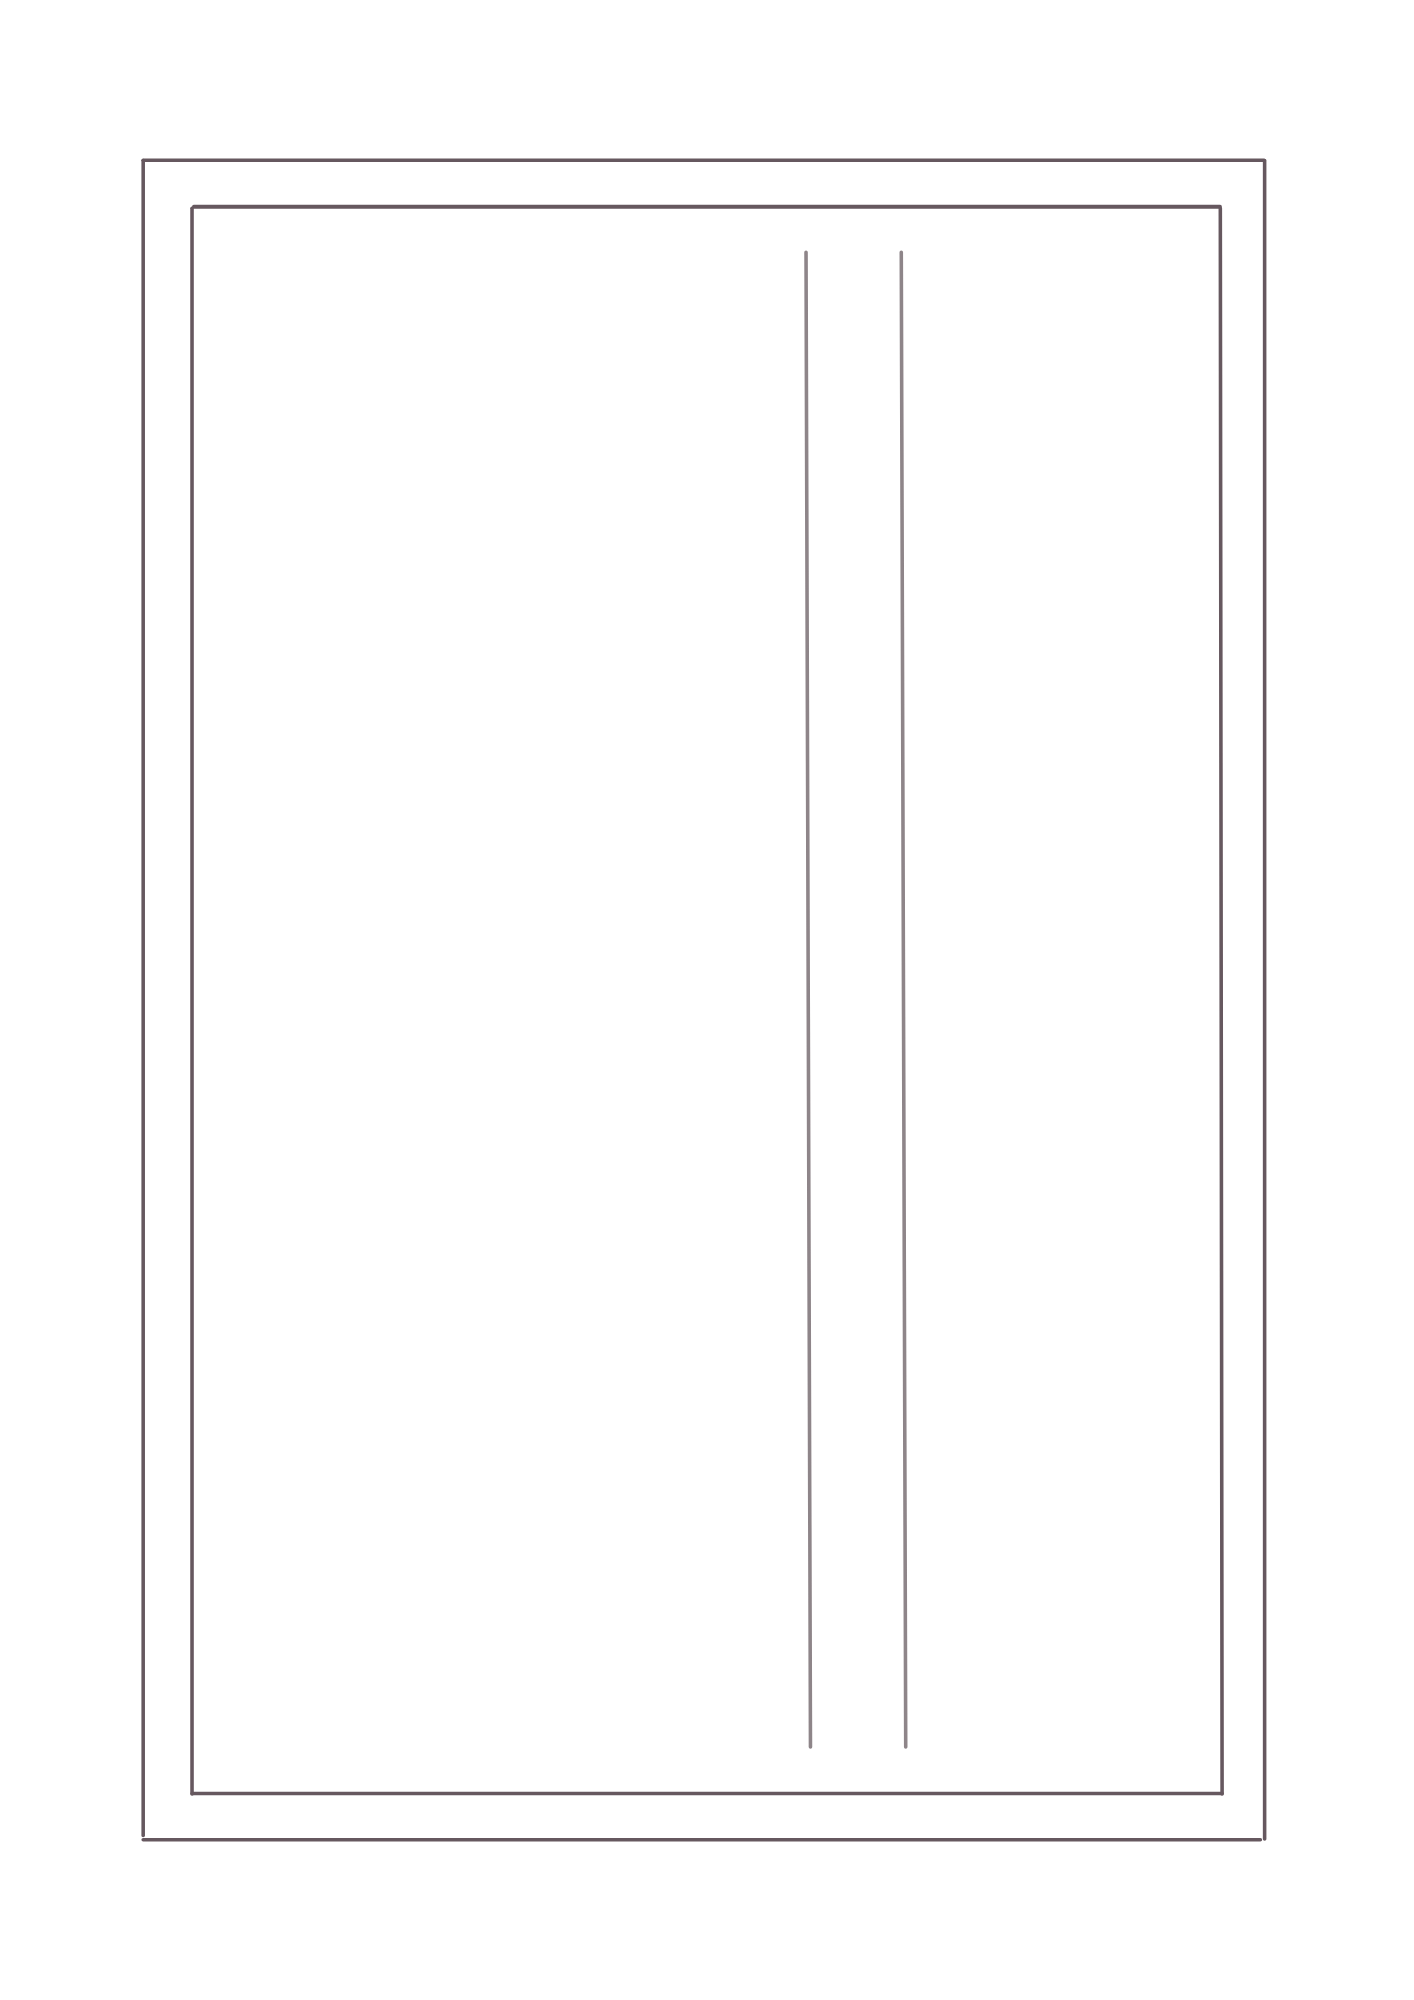
Cut out another piece of paper big enough to accommodate your pattern, and make sure that this is longer and wider than your pattern piece by at least 10 cm.
Draw one vertical line on your blank piece of pattern paper. Go back to your maths and draw a second line, parallel to the first line and the distance apart you need to add to your front half pattern, e.g. 3.75 cm.
6.
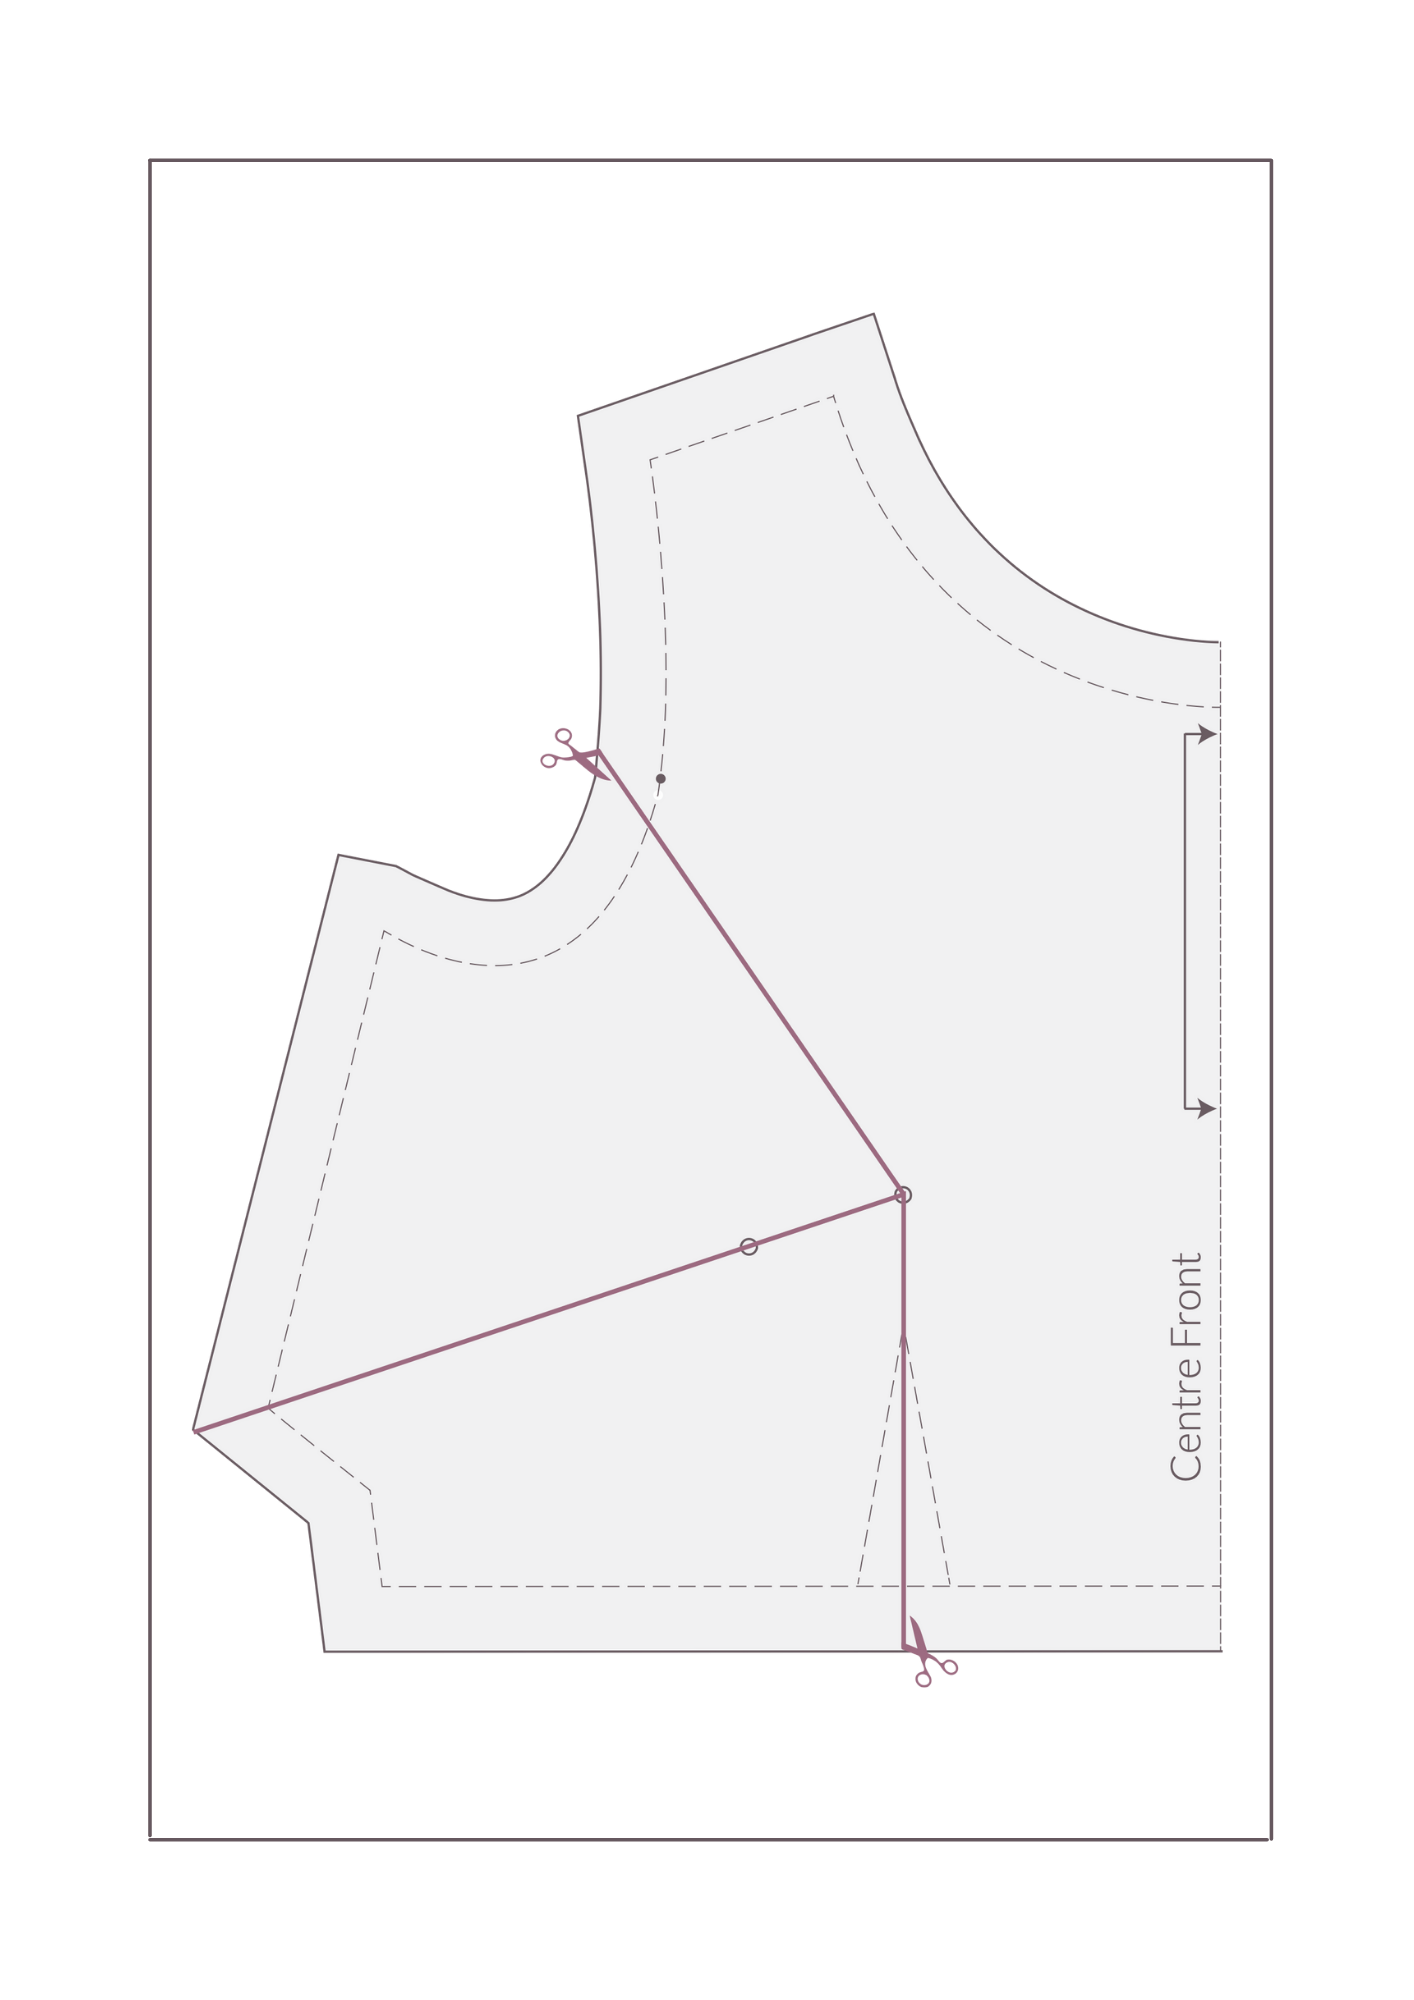
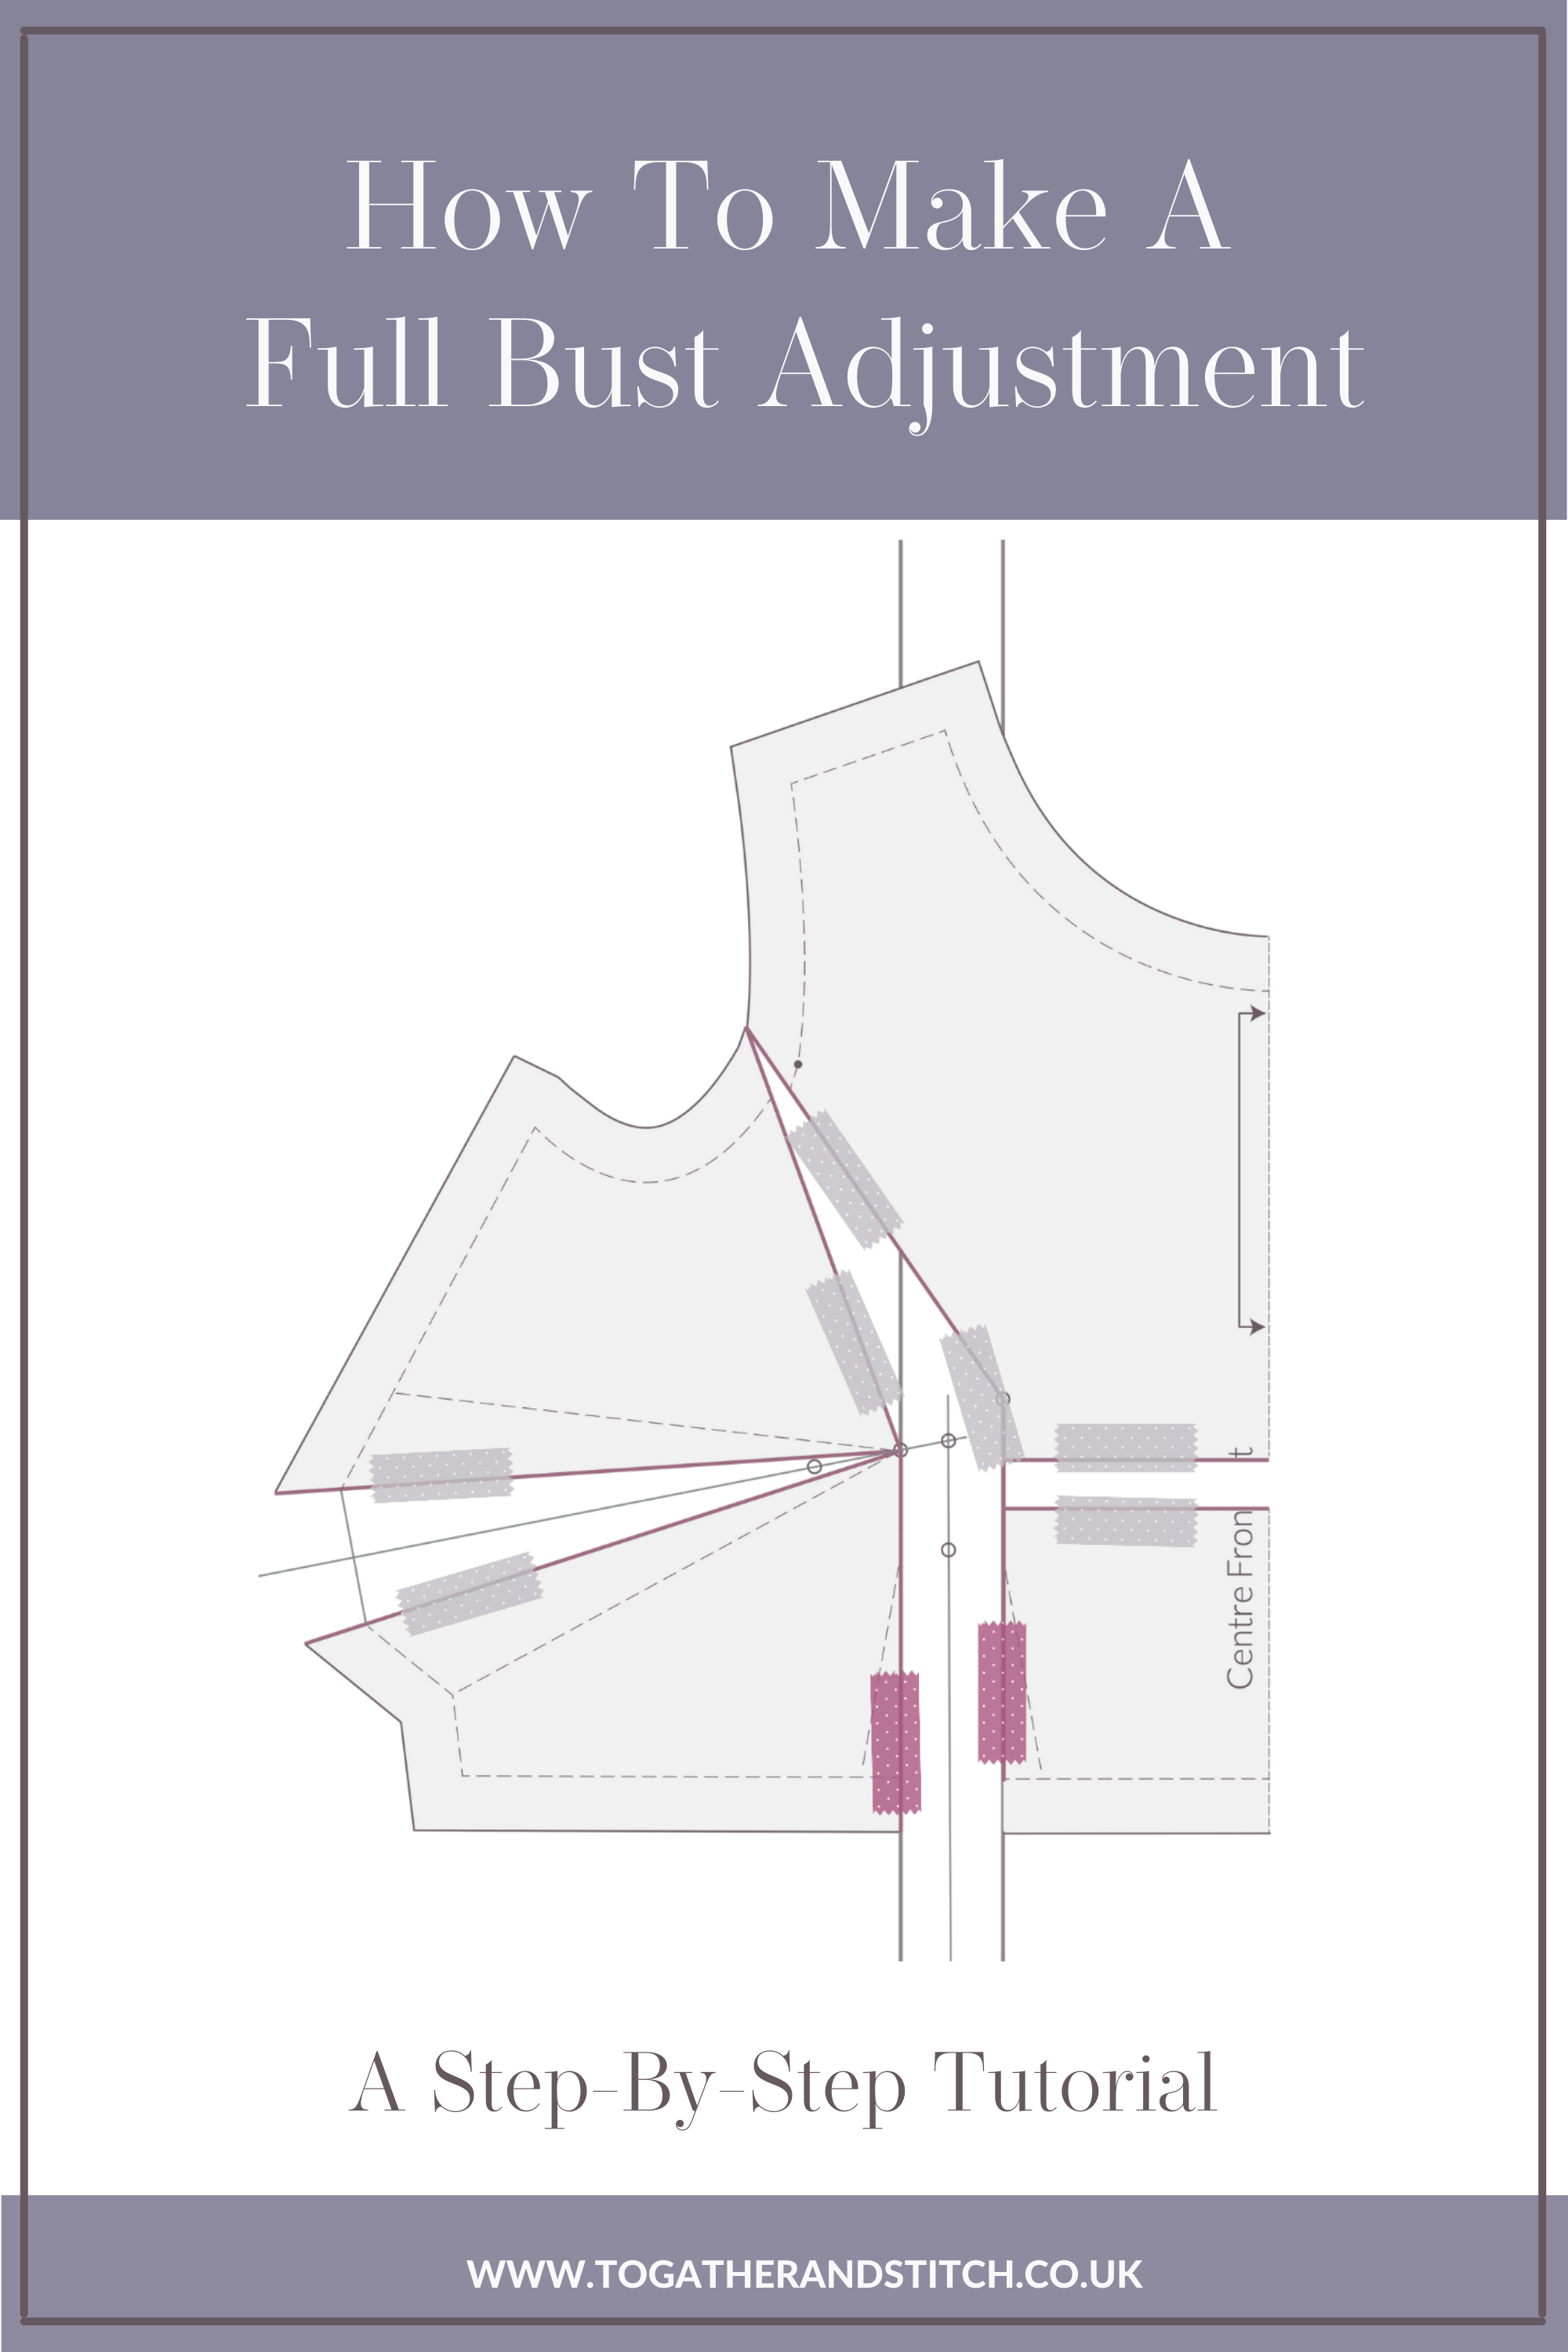
Go back to your traced front piece and use scissors to cut your traced pattern piece into two parts along the line running from the armhole to the waist.
7.
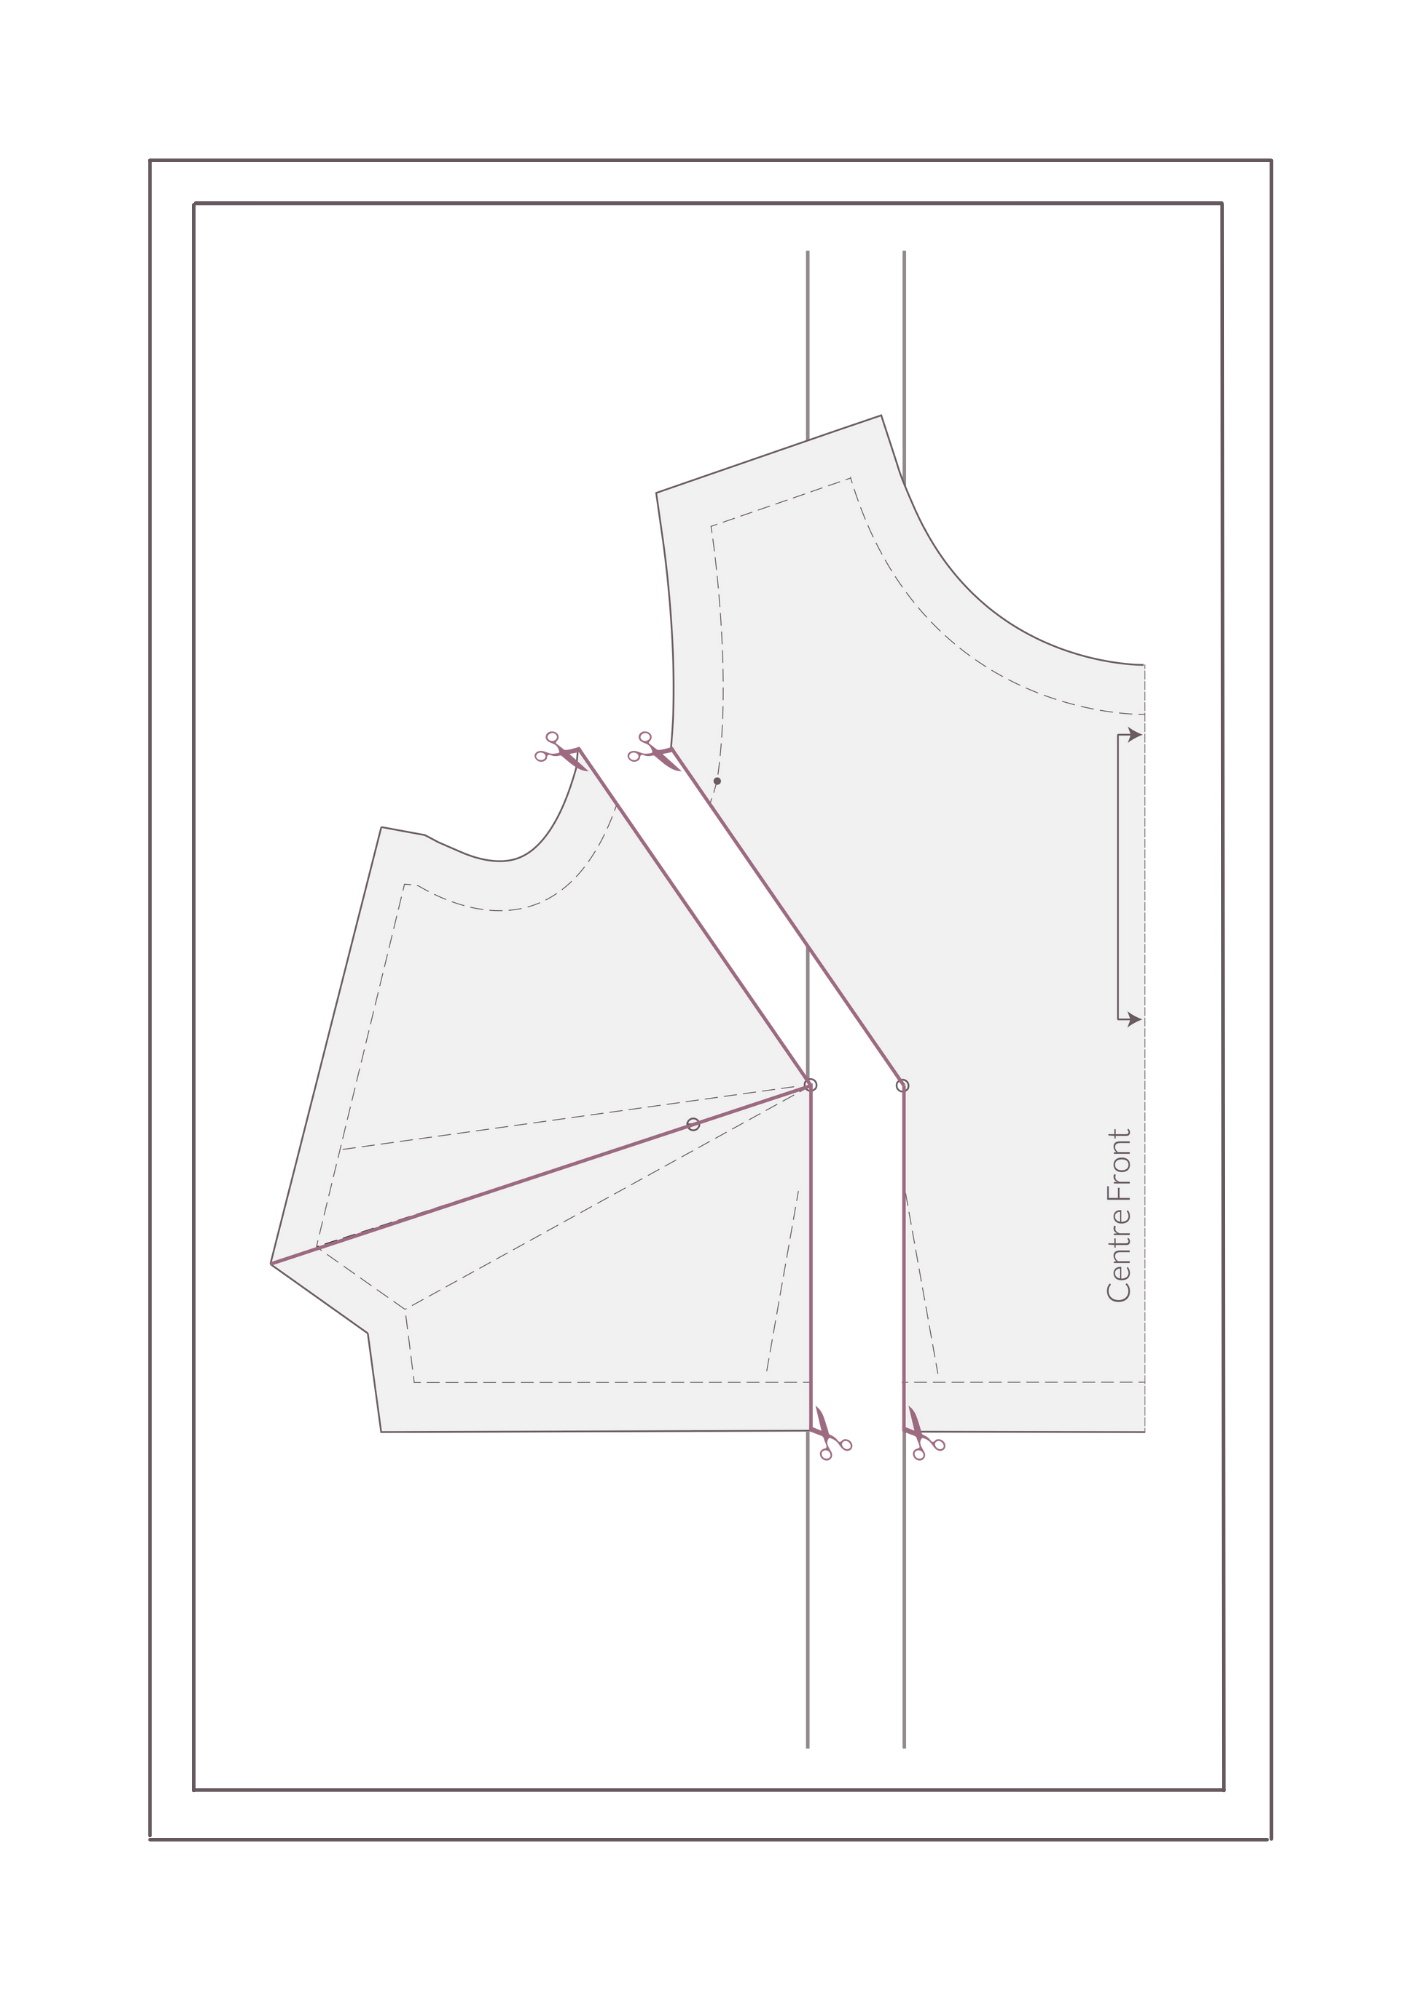
Layout the cut pattern sections so that they butt up to these lines.
Tape the top of the front section to the paper underneath.
8.

Washi or masking tape is great because you can easily peel it and move it if you need to.
Pivot the side piece at the bust point to meet the armhole, but the bust points stay level. Tape the top of the side section in place.
9.

Cut along the line you drew earlier through the middle of the bust dart.
10.
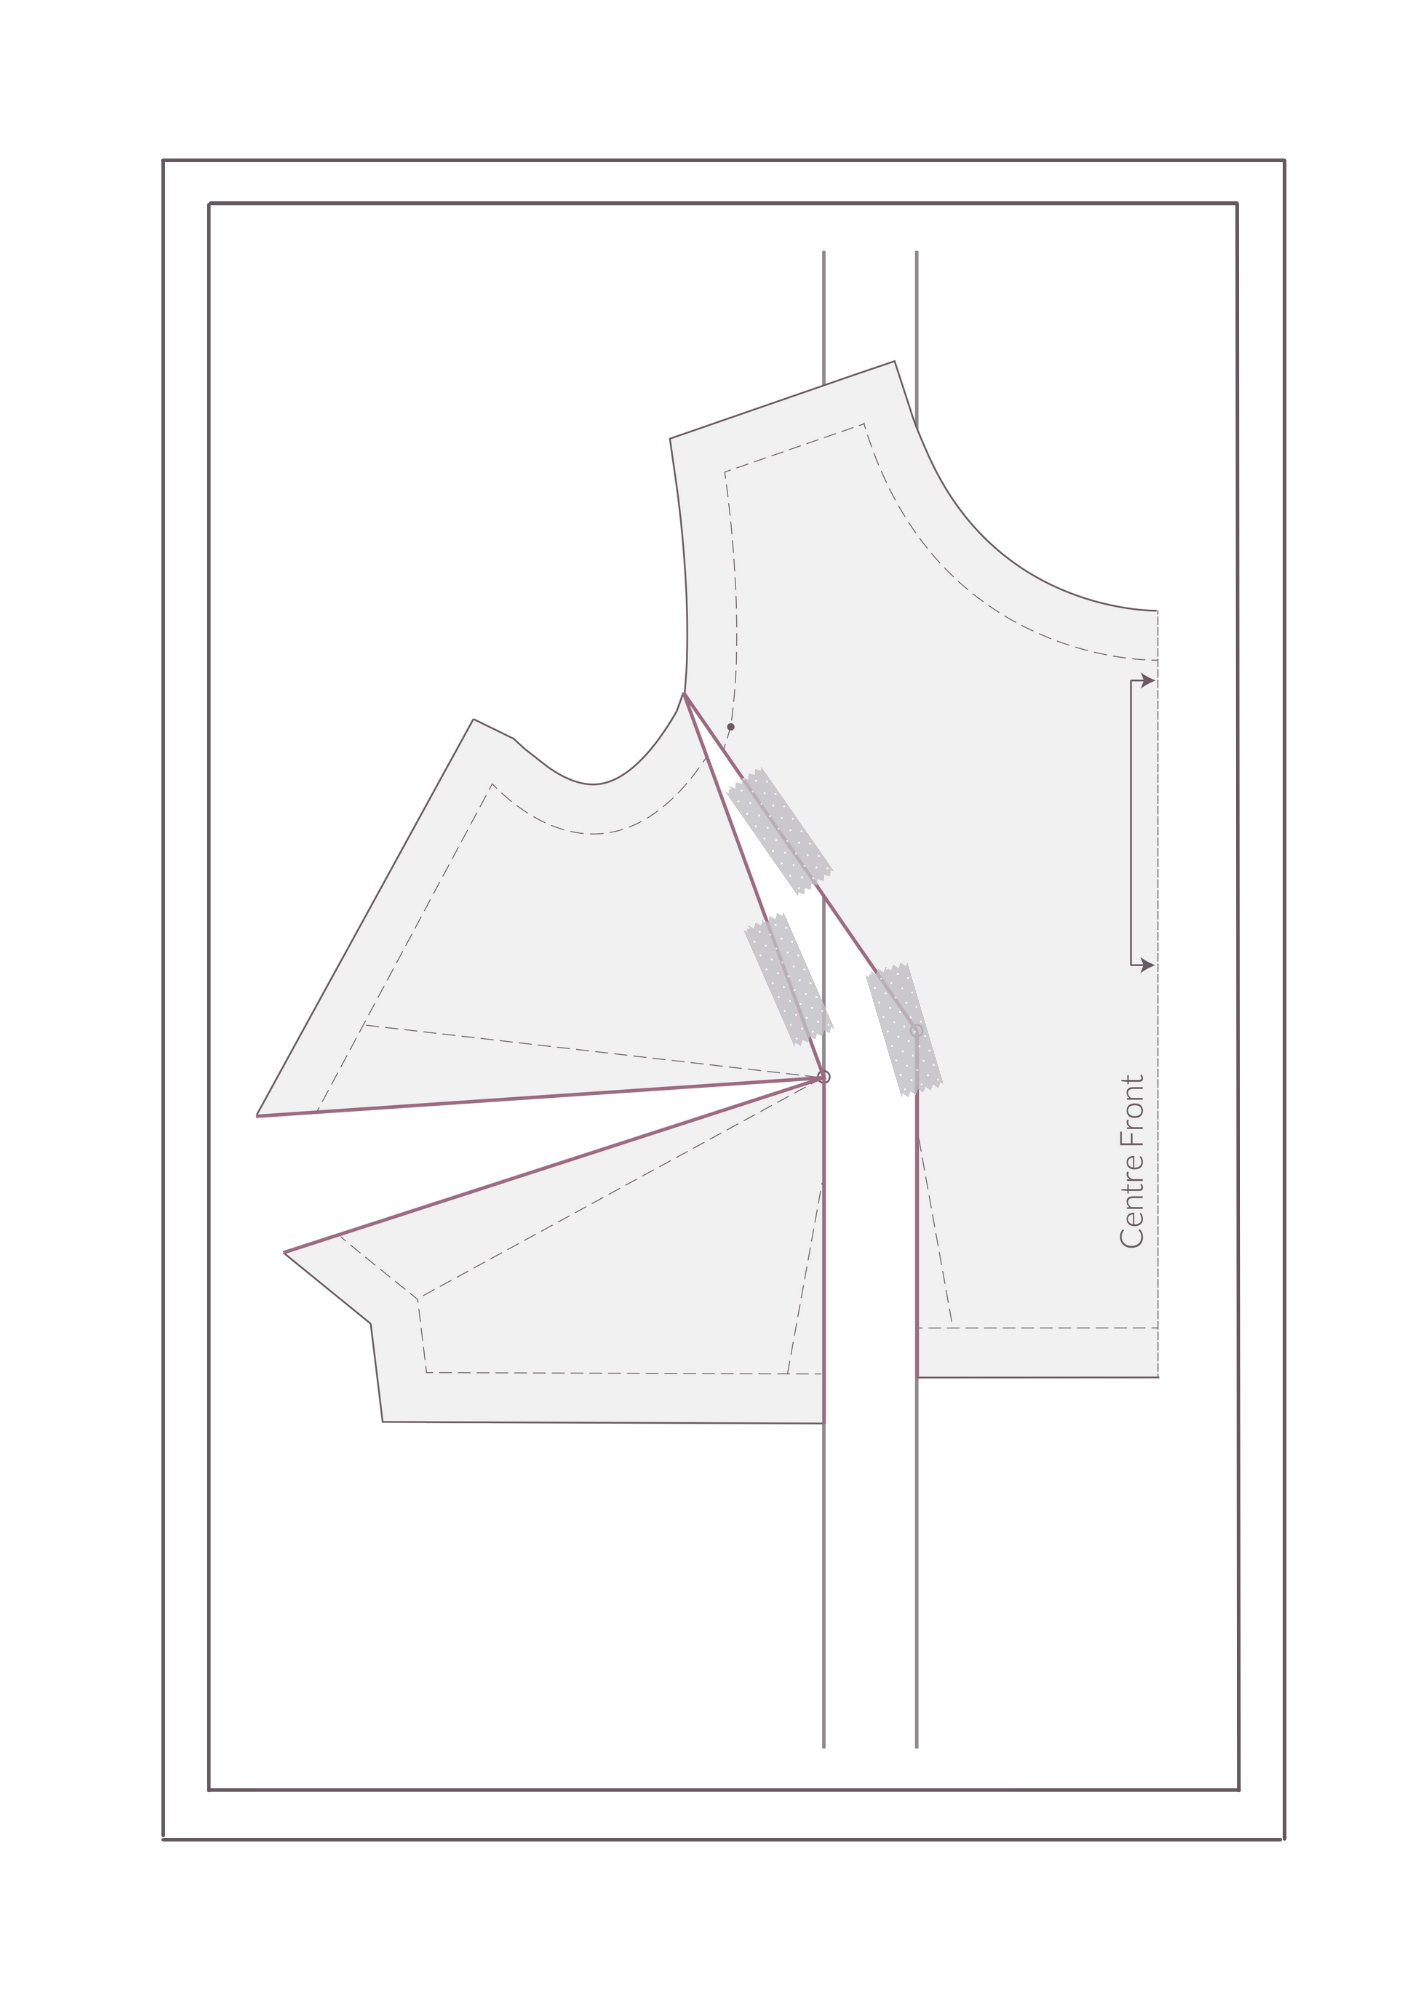
Open the dart so that the centre of the waist dart is back along the second parallel line.
11.

You’ll notice that the waistline isn’t level anymore. The front section needs to be made longer ( part of the plan as a FBA allows extra length to accommodate a larger bosom. So draw a line at a right angle to the centre front at or just below the bust point.
12.

Cut along this line and move the lower front section down so that it’s on the same level as the side section at the parallel lines at the waist. And tape in place.
You’re nearly there!
13.

Finish the pattern alterations by redrawing the bust and waist darts.
Draw a line from the centre of each new dart to the bust point. Make points along these lines 5 cm away front the bust point. Shorten your darts to these points.
14.

Trace your new pattern piece, making sure that you copy all the marks on the pattern.
Et voilà, you’ve added extra length and width to the front of your pattern, but your shoulder and side seams will still match the back of your pattern. Time for a cup of tea!
Make sure that you check and refine the fit by making a muslin or toile.
Happy sewing!

PS. Sign up for my newsletter to receive a regular dose of prettiness and details of upcoming masterclasses.
PPS. For more information on my couture atelier, please click here.
Are you on Pinterest?
If you enjoyed this post here’s some pins to share


Related posts


